Prototype Printing Defects: Why Cards, Game Boards, and Punchboards Fail
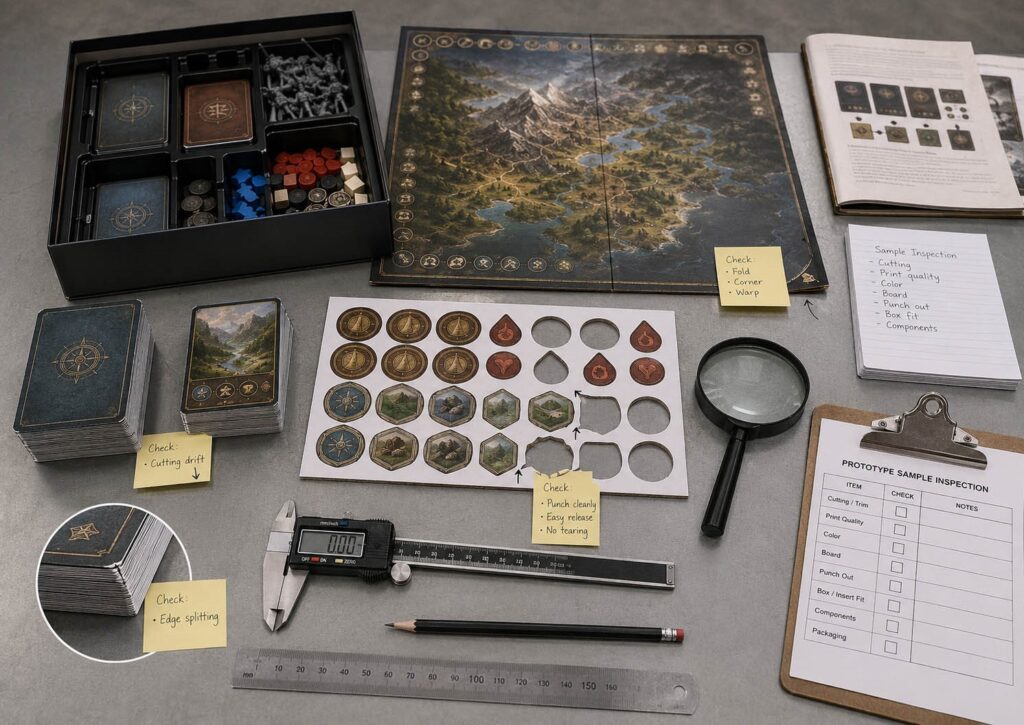
A board game prototype can look fine in a mockup and still fail on the table.
Cards can show cutting drift.
Card edges can split.
Full-bleed backs can reveal white lines.
Mounted boards can warp.
Board corners can crack.
Punchboard tokens can tear instead of releasing cleanly.
A box can close in the sample room but become too tight after all components are packed.
These are not random accidents.
Most board game prototype printing defects come from three places:
From a factory side, a prototype is not just a pretty copy of the game. It is a stress test of the production direction.
If the sample fails, the useful question is not only:
“Who made a mistake?”
The better question is:
What part of the design, file, material, or process was not ready for physical sample?
This article is part of our 2026 series: Board Game Prototyping Problems Creators Face in 2026.
The series looks at the problems independent creators meet before mass production: lost prototype options, overcomplicated designs before the first paid prototype, small-batch pricing, printing defects, dark artwork risks, and AI-generated files that still need factory cleanup before they can be produced.
A Prototype Defect Is Not Always a Printing Defect
The word “printing defect” is often used too broadly.
A designer receives a bad sample and says the printing failed. Sometimes that is true. Sometimes the root cause is cutting, mounting, lamination, die-cutting, glue, humidity, file setup, or packaging fit.
Cards, game boards, and punchboards are not judged only by how the ink looks.
A card must cut cleanly.
A deck must stack evenly.
A board must fold without cracking.
A punchboard must release tokens without tearing.
A box must fit the real component stack.
The printed front and back must stay aligned within tolerance.
That is why prototype inspection should not stop at color.
Color matters, but it is only one part of the sample.
For a board game manufacturer, the more useful inspection sequence is:
Most failures start before step 6.
But many creators only notice the problem at step 6, when the sample is already packed.
Card Cutting Drift Is Normal; Bad Layout Makes It Visible
Cards are not cut one by one like digital images on a screen.
They are printed in sheets, stacked, cut, corner-rounded, sorted, and packed. Even with good equipment, cards should not be designed as if cutting is zero-tolerance. For most custom playing cards, we normally allow around ±0.5 mm cutting tolerance.
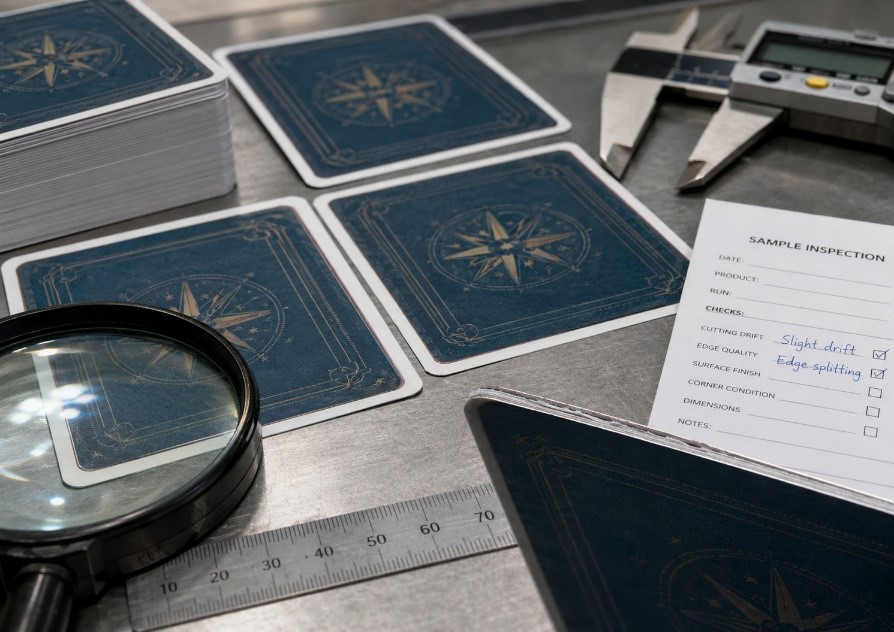
The problem is not that cutting drift exists. The problem is when the artwork makes normal cutting drift impossible to hide.
Full-bleed card backs are the common example.
If a card back has a thin border, exact frame, or centered line near the edge, even small cutting drift becomes visible. One side may look heavier. The opposite side may look too thin. If the card back is used in a hidden-information game, visible variation can become a gameplay problem.
This is why bleed and safe area matter.
A good card file should not place important borders, icons, text, or alignment-sensitive graphics too close to the trim line. The artwork should extend past the cut line, but the important visual area should stay safely inside.
For most custom cards, we usually want:
This is not the factory “being careless.”
It is how paper products are manufactured.
If a design only looks good when the cut is mathematically perfect, the design is not production-friendly yet.
Card Edge Splitting Means Material and Finish Need Review
Card edge splitting is different from cutting drift.
Cutting drift is position movement.
Edge splitting means the card layers or paper edge start to separate, crack, or look rough after cutting, corner rounding, shuffling, or handling.
This happens because of several reasons:
In board game card printing, the edge is where material honesty appears.
A card may look good on the face. But if the edge looks layered, fuzzy, or cracked, the deck will feel cheap in use. For prototypes, this matters because samples are often handled harder than retail copies: designers shuffle repeatedly, reviewers inspect closely, and publishers compare them against professional games.
Not every edge issue means the whole production route is wrong. Sometimes a sharper blade, adjusted process, different paper stock, or changed surface finish solves it.
But if the card structure itself is not suitable, polishing the artwork will not help.
Card material should be chosen based on use, not only price. A heavily shuffled deck should not be treated the same as reference cards that sit on the table.
The factory can recommend stock and finish, but the designer still needs to explain the card function.
A hidden deck, a player aid, a tarot-size board, and a mini card deck do not carry the same handling risk.
Punchboard Problems Usually Come From Tolerance, Shape, and Release
Punchboard failure is one of the most frustrating prototype defects because the sheet may look perfect until the first token is pushed out.
Then the token tears.
Or the surface paper lifts.
Or the edge becomes fuzzy.
Or the token stays too tight.
Or the token falls out too easily before the player uses it.
Punchboard problems often come from a mismatch between material thickness, die-cut depth, artwork layout, token size, token shape, and release expectation.
A clean punchboard needs balance.
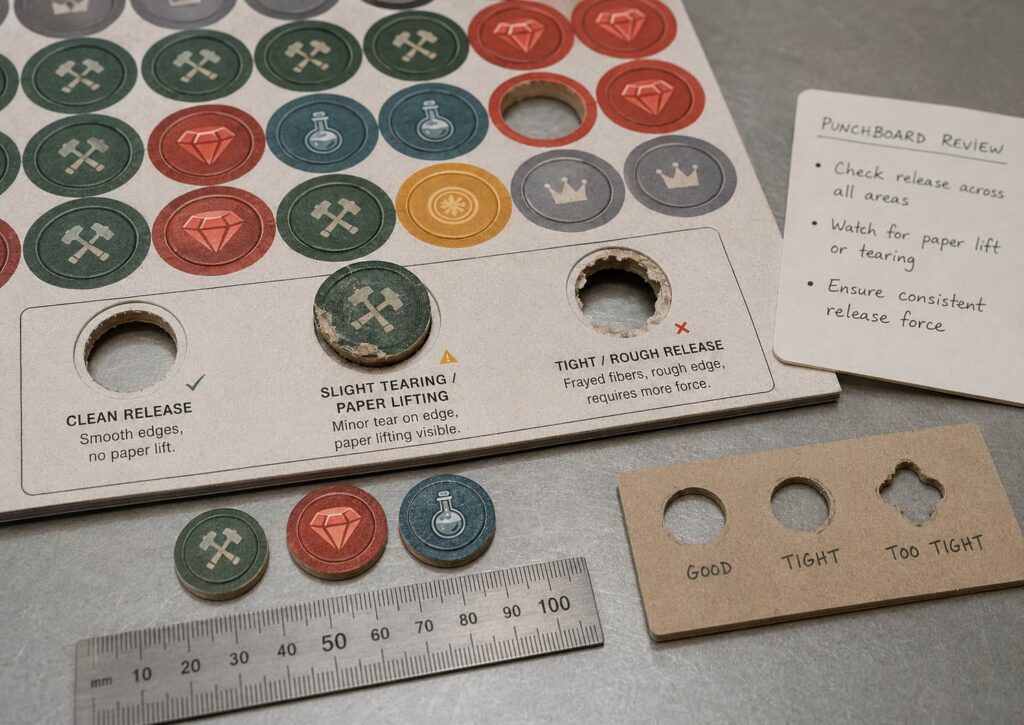
If the cut is too shallow, tokens are hard to remove and may tear.
If the cut is too deep, tokens may fall out during packing or shipping.
If the token is too small or too complex, the edge may not release cleanly.
If the paper mounting is weak, the surface may peel.
If the artwork has dark edges, tearing becomes more visible.
Double-sided punchboards add another risk: registration misalignment.
A double-sided token may look simple in the file. But in production, the front print, back print, board mounting, die-cutting tool, and sheet movement all need to stay within tolerance. For punchboard tokens, a practical front/back and die-cut alignment tolerance is often around ±0.5–1.0 mm, depending on token size, board thickness, sheet layout, and die-cutting structure.
That number may sound small on a large board. On a 20 mm or 25 mm token, it becomes very visible.
If the artwork has a tight ring, thin outline, or centered icon close to the cut edge, even normal movement can make the token look off-center. This is why important artwork should not sit too close to the die line. For small tokens, we normally prefer at least a 2–3 mm visual buffer wherever the design allows it.
💡 Pro Tip
The practical rule is simple: Do not design double-sided punchboard tokens as if both sides will land perfectly on the cut line. Give the artwork room to move. Use wider borders. Avoid tiny edge frames. Do not place small icons too close to the cut path. Keep front/back alignment expectations realistic. Use common backs when the front side carries the main information.
Die-cut burrs are another common issue. A simple circle, square, or large hex is easier to cut cleanly. A tiny gear shape, sharp star, narrow weapon silhouette, or complex irregular outline is much more difficult.
A vector outline has no paper fiber.
A real token does.
If the shape is only decorative, simplify it. If the shape has gameplay meaning keep it and make the outline stronger.
A die cut piece should look good when it is cut, not just before it is cut.
Mounted Game Boards Can Warp, Crack, or Lift
Mounted game boards fail differently from cards.
A card mainly needs clean printing, cutting, corner rounding, and shuffle feel.
A mounted board needs more:
Laminated board warping can happen when paper, greyboard, moisture, glue, and surface finish are not balanced. One side may pull more than the other. A large board may be curved, a thin board feel weak and a heavy board would increase box height and shipping weight.
Board corner cracking is another common issue.
Corners and fold areas carry stress. If the surface paper, lamination, or wrapped edge cannot handle bending and compression, cracks may appear. Dark artwork makes this more visible because white paper fiber shows through.
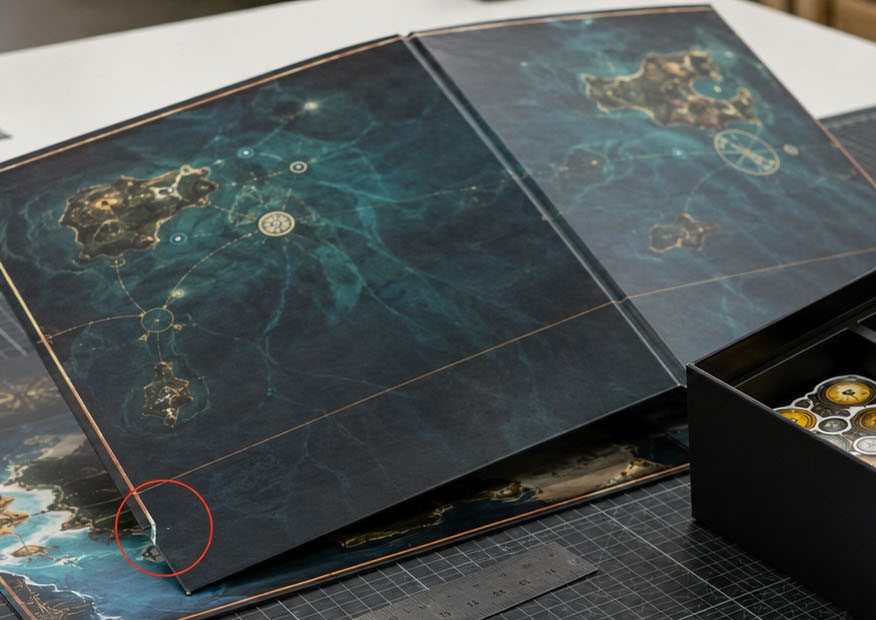
Fold structure matters too.
A bi-fold board, quad-fold board, and six-fold board do not behave the same. The more fold lines there are, the more hinge and alignment control hard. The hinge may become stiff, bulky, or fragile if the board is too thick for the chosen fold,
This is why board design should start from play area and fold logic, not only finished size.
A mounted board is not just a big printed sheet.
It is a mechanical part of the game.
If the board must fold, open flat, fit the box, resist warping, and survive repeated use, the prototype needs to test those physical conditions.
For dark or high-contrast board artwork, the problem becomes even more sensitive. Cracks, color shift, shadow loss, and lamination change can become obvious. We cover that print-risk side in Rich Black and Dark Artwork: How to Avoid Muddy Board Game Printing.
Box Fit Problems Are Often Caused by Late Component Growth
Some prototype failures do not look like defects at first.
The cards are fine.
The board is fine.
The tokens are fine.
The box is fine.
But the set does not pack properly.
The lid floats.
The rulebook bends.
Cards are too tight in the insert.
Tokens slide into the wrong compartments.
The mounted board presses into the tray.
The box depth is no longer enough.
This often happens because the component list grew after the box direction was chosen.
A box render is easy to approve. Real component height is less forgiving.
Deck height changes when card count changes.
Punchboard thickness changes when token count changes.
Rulebook thickness changes when rules keep expanding.
Insert clearance changes when a component shape is adjusted.
Mounted board thickness changes when the board structure changes.
This is why box size should not be locked too early.
For a factory sample, box fit is one of the most important checks. It connects design, material, packaging, and assembly. If the sample already feels tight, mass production will not magically become easier.
A box should have enough tolerance for real components, not just digital measurements.
The correct question is not:
“Can everything fit?”
The question is better:
Will everything fit without forcing, bending, scratching or slowing the assembly process?
If the answer is no, the packaging structure is not ready.
This is also why small-batch runs can become expensive very quickly. When components, insert, box depth, and packing order are not stable, the factory is not only producing copies. It is also absorbing uncertainty. We explain the cost side in Why 50, 100, or 200 Board Game Sets Cost So Much More Per Unit.
Which Problems Come From Files, and Which Come From Factory Process?
Not every prototype defect has the same owner.
This matters because the solution depends on the cause.
File-related problems often include:
Factory-process problems can include:
Some problems are shared.
Punchboard tearing may involve material, die-cut depth, token shape, and artwork. Registration misalignment may involve file design, sheet movement, and tolerance expectation. Dark board cracking may involve both surface finish and artwork choice.
Some prototype defects start inside the file, especially when artwork has no bleed, weak safe area, flattened UI, or dark AI-generated backgrounds. Use our AI Artwork Print-Ready Checklist for Board Game Prototypes before sending files for sample printing.
The useful approach is not blame first.
It is diagnosis first.
If a defect appears, ask:
A good manufacturer should be able to explain the likely cause and what can be adjusted. A good client should also be ready to change file structure when the file is part of the problem.
If your files include AI-assisted artwork, this diagnosis becomes harder when the images are flattened, low-resolution, or not separated into editable layers. We cover that file-preparation issue in AI Art in Board Game Prototypes: What Factories Actually Need From Your Files.
Prototype review is not only approval.
It is correction before the expensive run.
How to Review a Board Game Prototype Sample
When you receive a board game prototype sample, do not only photograph the box and say it looks good.
Inspect it like a product.
Start with cards.
Check cutting alignment, edge quality, corner rounding, color consistency, shuffle feel, and whether hidden backs can be marked by cut drift.
Then check mounted boards.
Open and fold the board several times. Look at corners, fold lines, surface cracking, warping, and whether the board lies flat enough for play.
Then check punchboards.
Push out a few tokens from different areas of the sheet. Check whether they release cleanly, whether the surface paper tears, whether edges are rough, and whether the front/back alignment still looks acceptable.
Then check the box and insert.
Pack everything back in the correct order. Do not only check whether it fits once. Check whether it fits naturally. If packing requires force, the design is already warning you.
Finally, check the whole set as a player would use it.
Shuffle cards.
Open the board.
Punch tokens.
Read the rulebook.
Take components out of the insert.
Put them back.
Close the box.
Many defects appear only when the product is used, not when it is photographed.
This is why a sample review should include handling, not only appearance.
One Warning Before You Approve a Prototype Sample
⚠️ Warning: Do not approve a prototype only because the first impression looks good. A sample can photograph well and still fail as a product. If the card backs reveal cutting drift, hidden information may be compromised. If the punchboards tear, players will remember the frustration. If the board corners crack, the game feels cheap before play begins. If the box is too tight, every copy becomes slower to pack and worse to unbox. If the dark artwork loses detail, the premium look may collapse after printing.
This article does not apply equally to every project. A simple card deck, a heavy Euro game, a miniatures game, and a campaign box do not carry the same defect risks. But the principle is the same:
A prototype should be approved by function, not only by appearance. Do not let a nice photo hide a weak production structure.
If you are preparing a board game prototype, send us your component list, artwork status, target quantity, and sample purpose. We can help review which parts are most likely to create printing, cutting, punchboard, board, or packaging risks before you spend money on a larger run.
Read the Full 2026 Prototype Problem Series
This article is part of our series: Board Game Prototyping Problems Creators Face in 2026.
The series covers the main problems independent creators meet before mass production: